
This is something that I should have done a long time ago. If you’re familiar with Nikon models, maybe you already know about this camera or at least heard about it. On a different scenario, maybe you have never heard about the FE before, and you are out there missing a great opportunity to own one of the trustful and finest cameras made by Nikon in the late 70’s.
For many of you, especially if you know about classic slrs cameras, this reading may appear basic and bored. But I can’t tell who’s gonna read this in the future. And you have to consider the possibility that first time film shooters or no-Nikon shooters, may find this information useful. The idea of writing this post, is to be informative to all those that are willing to learn. Thanks for your compression.
A brief introduction.
The FE is a 35mm film slr. It was introduced by Nikon in 1978 and it’s production runs until 1983. It wasn’t designed to be a “Pro Model”, it was intended to be an advanced semi-professional camera. Nevertheless, it’s a versatile slr that won’t disappoint you. Actually, once you buy one FE, it’s probably that you’ll consider to get a second camera,,, (or more).
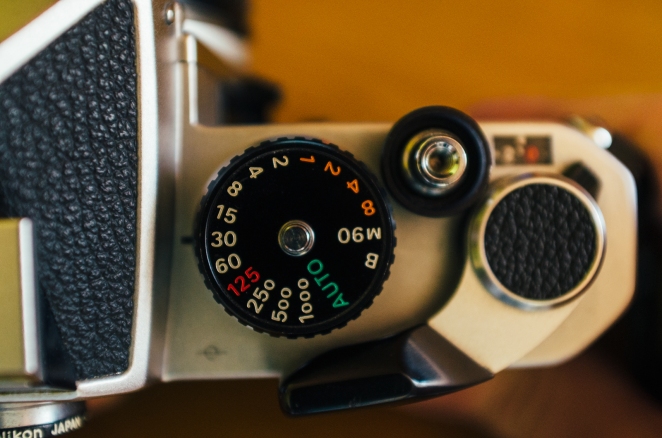
View of the right side of the camera controls.
Features.
* Shutter speed that goes from 8 seconds to a 1/1000 of a second. Also the “bulb mode” for a long exposures (a tripod and cable release is need it for this). As you can see, the 1/125 speed is painted in red. It means that’s the maximum velocity to sync with external flash units.
*Aperture priority mode. (Further explanation below)
*Can be use it without battery at 1/90 of a second (M90) and “Bulb mode”
*Self timer.
*Depth of field preview lever.
*Dedicated double exposure lever. (Further explanation below)
*Can be used with Pre-AI lenses (also known as Non-AI)
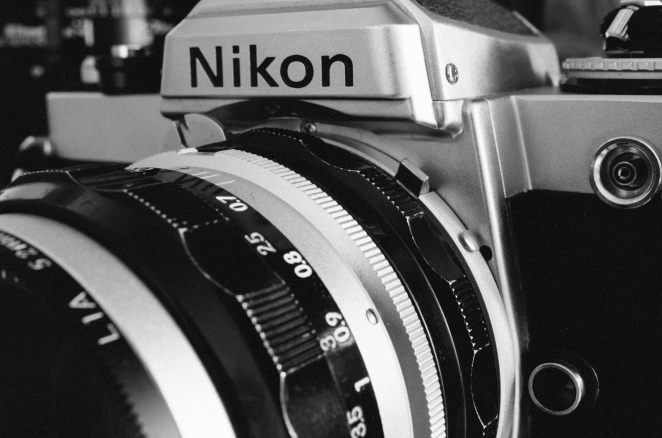
As indicated in the last feature listed, the FE can use Pre-AI lenses, AI, AI-S (included the Series E) and D series lenses. The G Series is the only exception, due to the fact that those lenses don’t have aperture ring. But even with the G Series aside, you can still choose from a huge selection of lenses from different periods. Many classic lenses have wonderful optics and can be found for a great price.
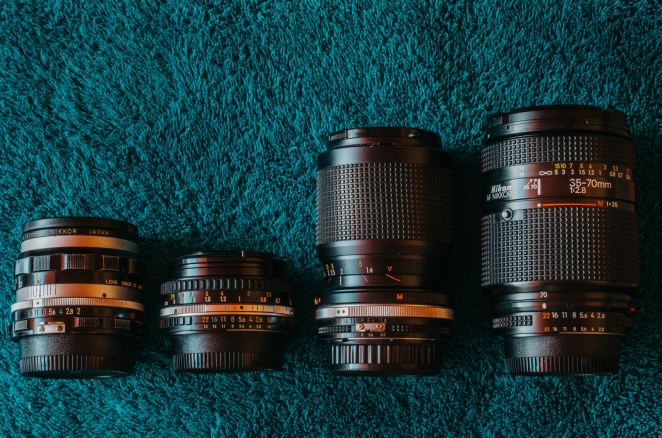
An example of Nikon’s Camera/lens flexibility. From left to right: Lens types: Pre-AI, Serie E (Ai), Ai & Serie D.
The Nikon FE it’s a manual camera. That means that you have to focus manually using the focus ring of the lens. When you attach a D series lens to the camera, the AF feature of the lens won’t be useful.
The lack of autofocus it’s not a problem for me. Just consider this: Many of the the most iconic photos of history were taken with manual cameras…. and yes, using FILM !
How to use a Non-AI lens in a Ai/Ai-s camera??
The Nikon designers knew that many users back then had the older type Non-AI lenses. So, they came up with the idea of make a retractable coupling pin. Before attaching any Pre-Ai lens, you have to press a tiny button and then pull up the pin. Let’s see the the pictures below.
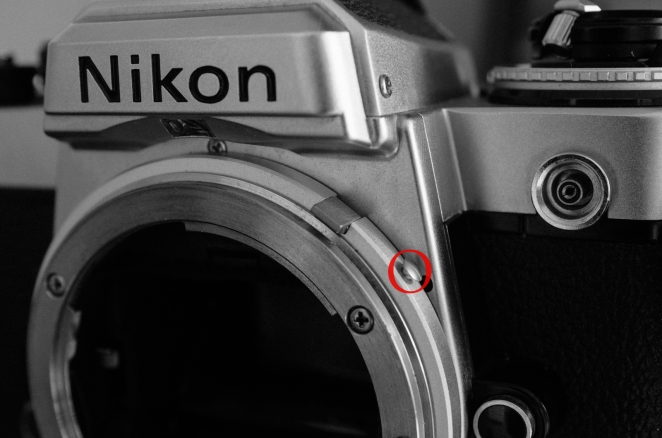
Press (and while keep it pressed) pull up the coupling pin that is on the left.
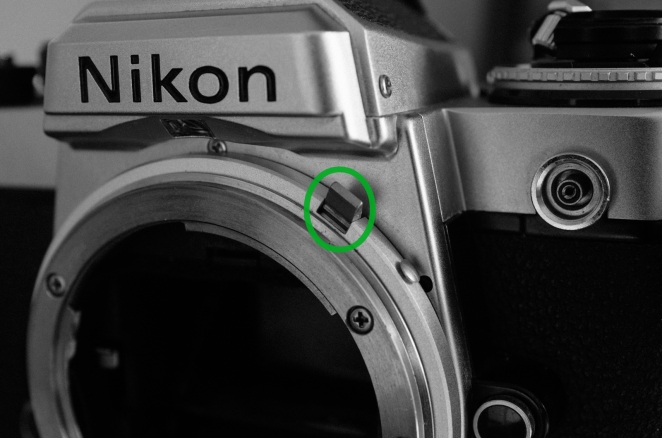
When the pin is been pulled on the “up” position, it’s safe to attach the Non-Ai lens. Not following these procedure, may damage the lens, the camera´s lens mount or both!
That’s a Nikkor 50mm f/2 Pre-Ai lens mounted on the FE. Once you remove the Pre-Ai lens, there is no need to press the silver button again. The coupling pin will fall back down into position as soon as you touch it.
Note: To be able to calculate the correct exposure with a Pre-AI lens, you have to press the depth of field lever (and while keep the lever pressed) then make the exposure adjustments.
Before loading film, check the battery!
The Nikon FE uses 2 L44 Lithium batteries. Those batteries power the metering system of the camera. The batteries will last a couple of years with regular use. However, they are inexpensive and readily available, if you’re extremely cautious, it won’t hurt the camera to put fresh batteries once a year. When the batteries are low powered, the camera will stuck up the mirror when you press the shutter. In that case, you’ll have to select the M90 speed from the shutter speed dial in order to make the mirror go down again. But before go to those extremes, you can check the camera’s battery power with the power check lever.
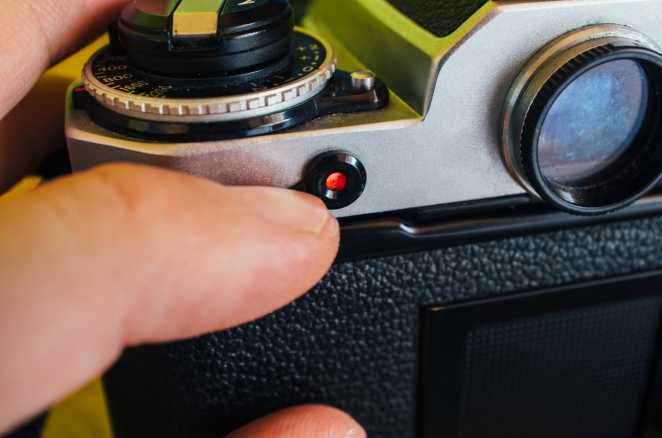
The Power Check lever it’s located in the upper left back of the camera. Just pull it down nicely. If there is bright red light, you’re ok. When the light starts getting dimmer, it’s time to look for your backup batteries.
Now you can load the camera with your favorite film. This process is almost identical to other 35mm slrs. By now, my two FE’s are already loaded with a fresh rolls. So, I’ll skip to show this part. There is something different that you have to do, before loading a FE with film. But also you have to do it again right before take out the used film, so let’s put an “imaginary mark” right now (**) I’ll cover that topic later on 😉
How to “turn on” the FE?
If everything in this life were as simple as “turn on” a Nikon FE! Just turn slightly to the right the camera film advance lever until a big and obvious painted red dot gets visible ( 1 ). At that point, the two needles inside the viewfinder will start to move according to the light readings. See the picture below.

1) The red dot indicates that the camera is “on”. 2) The shutter. 3) The film counter window. 4) The film advance lever.
Once the camera is loaded with film. Turn the film advance lever all the way to right side. The camera will transport the film and the numbers on the film counter window should move as well. Press the shutter and repeat the procedure until you reach number “zero”. After pressing the shutter on “zero”, the next frame you advance, will be the first photo. Although, you can use “zero” as your first frame, if you like.
NOTE: The film advance lever works with an internal spring. To help the lever´s spring service life, do not store your camera with the shutter unfired. Also, turn left the film advance lever, to make sure that you “turn off” the camera and the batteries won’t drain it’s charge.
The Viewfinder.
As I was mentioned before, the FE uses a system that have two needles. When you look through the viewfinder, you’ll see a column on the left side with the shutter speed numbers and two needles. There is one green needle, which corresponds to the shutter speed selected by you. The other needle is black and indicates the selected aperture of the lens. The idea is to make some adjustments with the settings that you want, until those two needles match
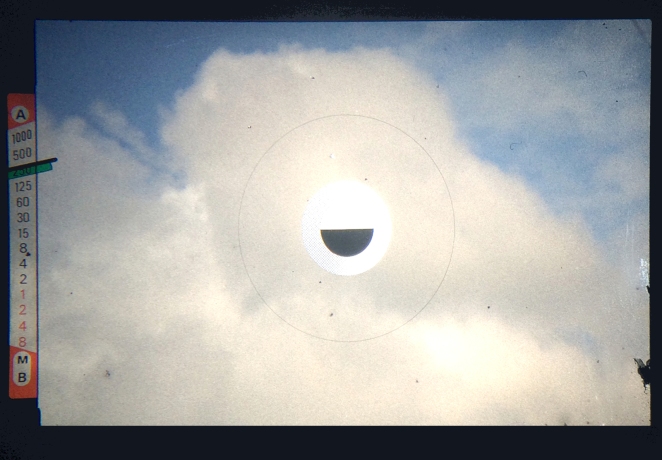
The “B” indicates the “Bulb mode”. The “M” when you are at M90 shutter speed. The “A” means that you are on “Auto” mode.
In the upper middle of the viewfinder (not pictured), there is a small window that shows the current aperture (f/stop) number of the lens. The FE reads the light of the scene through-the-lens (TTL) with a silicon photodiode light meter, with a 60/40 percent center weighted ratio. The 60% in a circle the middle of the viewfinder. The 40% left, is distributed in the corners of the viewfinder screen. If you have to take a photo with a harsh backlight, you’ll have to *compensate the exposure or AE lock the exposure and then recompose the image. *(Further explanation below)
The FE doesn’t have interchangeable pentaprism, but you can change its focusing screens (Available Types K, E & B). Although, I don’t think that will be necessary. The default Type K is just fine. The viewfinder covers approximately a 93% of the image.
Aperture Priority or “Auto” mode.
There is one “automatic” mode introduced by the Nikon FE. After setting the ISO (ASA) speed and selecting a desired aperture from the lens, you could let the camera calculate the shutter speed by turning the dial on the “auto” position.
At this setting, the camera will select the correct shutter speed according to the light of the scene. This setting could be useful if you’re in a situation where you can’t waste precious seconds to make all the three adjustments separately (ISO — f/ stop — shutter).

When you set the camera to “Auto”, the shutter speed dial will locked. Don’t force it! You have to press the silver button on the middle of the dial. While you keep it pressed, turn the dial in any direction to “get out from auto mode”.
Personally, I only have used the “auto mode” once. I was in a moving car, wasting film on “landscapes” (or at least that was my idea), but since the light changes randomly and sometimes to fast to make adjustments, it was a perfect time to “test the Auto mode” of the FE.
Next, a couple of sample pictures:
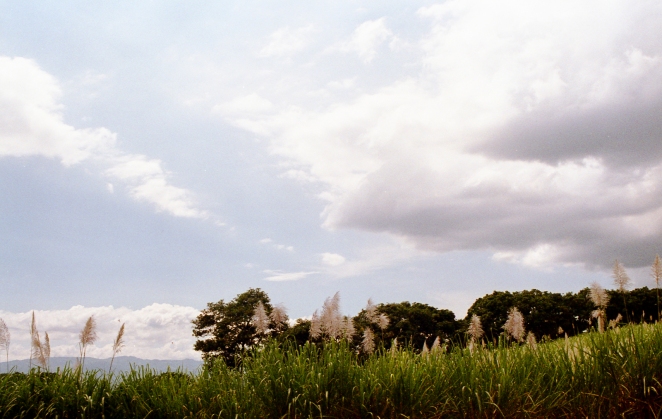
Plenty of available sunlight at noon.
Moody light at late afternoon.
As you can see, under different light conditions, the camera auto mode was accurate to calculate the correct exposure. So, if you’re in a hurry, just relax! The FE can handle it 😉
(In case you’re wondering, that’s Agfa Vista 200 )
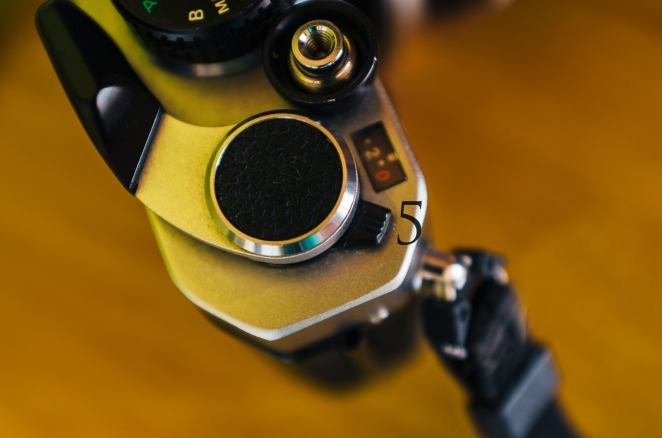
A dedicated tool for creative photography!
The Nikon FE have a dedicated feature to help creative minds have fun with double/multiple exposures. Under the base of the film advance lever, there is a secondary lever that retracts when you press it backwards. (Next to number 5)
After taking the first photo. Keep the double exposure lever pressed towards you. Don’t let it loose. While holding it pressed, turn to the right side the film advance lever to “load a new frame of film”. Well, you actually aren’t moving the film inside the camera. You’re cocking the shutter mechanism to take another photo, but inside the camera, this “double exposure lever” prevents the film keeps moving forward. So, when you press the shutter of the camera, the image captured will be recorded in the same previous frame of film. With this feature, you can make double or multiple exposures. Keep in mind the ISO of the film and the numbers of exposures on every frame. If you over-exposed the film many times or with the incorrect settings, you could end up with a photo with no image on it.
Self timer, AE lock & Depth of Field preview.
Located on the front of the right side of the camera, you will see a lever with a round base ( 6 ). That lever is the self timer of the camera. But this lever has a double function. If you move it all the way to the side marked as “A”, the lever will lock until you press the shutter. That’s the “self timer” function. After a few seconds, the lever will return to it’s default position and the camera will take the picture. I haven’t use a chronometer to test the time that it takes to shutter the photo, but if I would have to guess, I’ll say that takes approximately eight seconds.
If you move the lever toward the “B” mark, the camera will lock the exposure on the current light reading. (AE lock)
Note: If you push the lever to the “B” direction, the lever won’t keep that position if you let it loose, so, you have to keep pressing it down.
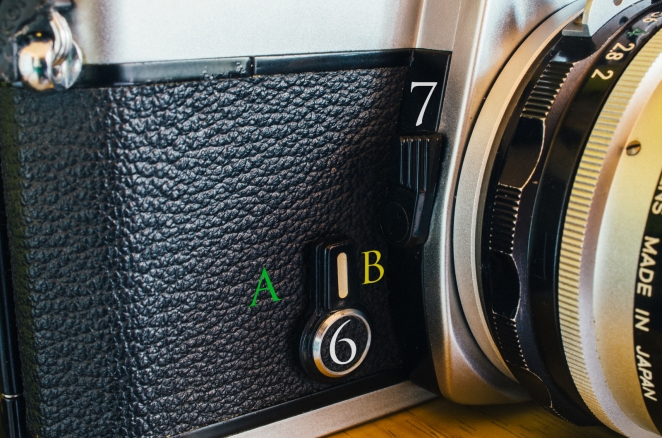
6A — Self Timer: Push it to the “A” direction until it locks. 6B—AE lock: Push it towards the lens (“B” direction). Keep it pressed down as long as you need it. 7 — Depth of Field Preview / Pre-Ai Lens exposure light reader.
The Depth of field preview lever (7) works when you pressed backwards (to the body of the camera). Internally, this lever closes the aperture blades of the lens to help you to pre visualize the depth of field of the settings that you have selected.
When there is a Non-Ai (Pre-Ai) lens attach to the camera, you have to use the Depth of field preview in order to calculate the exposure. Remember that Pre-Ai lenses were an older lens technology, even back in the day for FE users. Having the privilege to use those “old lenses”on a “newer” camera body was a “borrowed feature”, and you have to pay for it, somehow. But if you’re an objective person, you’ll see that pressing down a lever (a very smooth lever) to calculate the exposure, is not the end of the world. There are a lot of Pre-AI lenses out there with beautiful optics and labeled with low prices. Knowing that, just keep pushing a lever down, won’t kill you. Besides, you could use a dedicated “Light meter” or a cellphone app to set the exposure.
Non-Ai lenses also can be modified to be used as “Ai lenses”. You can learn to modified the lenses by yourself or you could ask to a qualified technician in a camera store or repair shop, to do it for you. 🙂
ISO dial and Exposure Compensation control.
At the top left of the camera, you’ll find the ISO (ASA) dial. This dial shares its design with the Exposure Compensation control and the film crank (which also can be use to open the back film door of the camera, prior to load or unload film) — See the picture below.
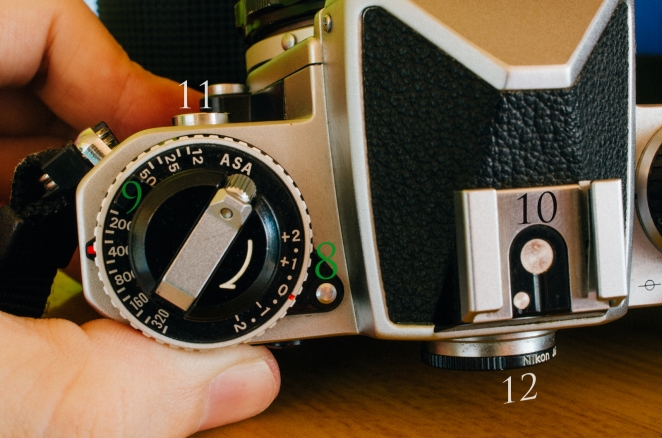
8) In order to change the ISO speed, you have to press the silver button (just below the 8 number of the illustration). While you keep it pressed, turn the dial to the film speed needed. The red index in the left side of the photo, shows the marking of the ISO setting that was selected.
To change the Exposure compensation, grab firmly the outer silver ring of the ISO dial, where the little red dot is aligned with the “zero value”. Carefully pull it up and proceed to rotate to +EV or -EV values, according to your adjustment needs.
9) Let’s say that you are happy taking pictures with your beautiful FE. Wishing to have some sort of magic roll of film that never it’s gonna end! But without notice, you just finished the last frame of the roll. What is going to happen next, is that your film advance lever won’t move to it’s complete final position and your shutter will lock. You confirm your worse fear. The film frame counter window tells you that there is not more film frames to shoot. Unless you have more film with you, the fun is over! In that case DO NOT FORCE THINGS! Just proceed as it follows: Do you remember the “imaginary mark” that I’d mentioned earlier?? (related to the topic about loading/unloading film to the FE) Well, that’s number 9! Before attempt to open the film door in the back of the camera with the film crank lever, you have to look under your camera plate for a little silver pin and press it down until gets loose (see number 13 in the next photo), rewind the film with the crank in the direction that the white painted arrow suggests. Once the film is completely rewind, press down towards to you, the little black lever (positioned right where the “number 9” is picture) and while keep it in that position, pull up the film crank lever, until the film door opens.
10) Hot shoe for flash units.
11) In the upper front left of the camera, there is a small circle. That’s the PC sync terminal to connect the camera with flash units at the maximum set value of 1/125 of a second.
12) The viewfinder of the camera. It’s worth to mention that the viewfinder ring is threaded to accept diopter ocular pieces to correct visual problems of the user (not included with the camera — Sold separately).
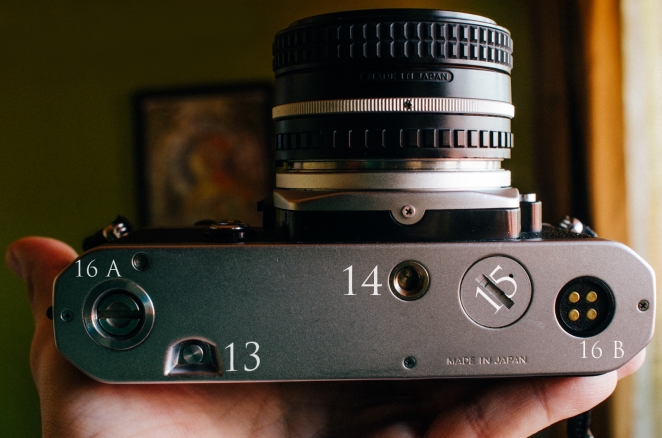
13) As mentioned above at point 9), you have to press down the silver pin before rewind the film with the crank.
14) Tripod thread. Necessary for glorious long exposure photos.
15) Battery door. You can open it with coin.
16 A & 16 B) Terminal connections for MD-11 or MD-12 motor drives.
Where can you get a Nikon FE camera?
You can find a nice and clean unit on Ebay between $65 to a $115. Excellent condition FE could cost you $100 and above. Depends of the camera conditions and the criteria of the seller. My black FE cost me $40. It functions as it should, but has a few scratches. Nothing major, but the previous owner didn’t love her anymore just for that. Keep in mind that the “newest FE” out there, was produced in 1983. That’s more than 30 years! Of course they gonna have little blemishes, even when they are tough cameras. But sometimes you find great deals!
Note: Always read the description of the seller. Extremely cheap film cameras, are often sell for “parts only” or “repair”. Read carefully!
Conclusion.
Doesn’t matter if you are a Nikon fan or not. If you like film photography, this Nikon camera is definitely a “must have ! “ You can find the FE in a black and silver color or a black version only. You can choose the more appropriate version to your liking. Or do it like me: Get the two FE versions!
A discrete camera in size, packet it with a lot a great features and compatibility with a lot of quality Nikkor lenses…. Is there something not to like about the Nikon FE?
Get yourself one FE, grab a few rolls of your favorite 35mm film stocks and fall in love with her on a weekend getaway!
Thanks for reading this! 😉

Great review. For a novice Nikon user like me, the explanation of the Non AI lens and mount is something I’ll have to come back to should I ever get an FE.
LikeLiked by 1 person
Thanks Shaun!
I’m glad this information has been helpful for you.
The FE is a great starting point for film shooters. Doesn’t matter if you already have other Nikon cameras or it’s your first one. In the end, it’s a great choice!
LikeLike
Or if you wish to retro. from digital back to film for a while, the FE will remind you of the good old days.
LikeLike
I own one too and it’s one of the best film cameras ever! Actually, I learned shooting film on this.
LikeLike
The FE is great. I hope you can enjoy yours for many years more. Thanks for reading!
LikeLike
It’s people like you that make the Internet a wonderful place. Thank you for taking the time to write such a fantastically insightful and well written piece. I just bought an FE and this page was far more informative than the manual. Thanks!
LikeLiked by 1 person
Thank you for taking the time to read this! I’m glad to know that you got a Nikon FE. They are well made and trustful cameras. Enjoy it! 😀
LikeLike
Also recently bought an FE to make use of a bunch of AI and AI-converted lenses that were a recent gift. It is an outstanding camera and you covered its features very well in your post. I had never used a Nikon camera before, even though I’ve been shooting film with Canon EOS and Contax 35mm bodies and a Rollieflex 3.5F for the past couple of years after becoming disillusioned with the sameness of digital photography. I will be using the FE a lot – it’s a wonderful camera.
LikeLiked by 1 person
Is good to know that you will use those lenses! The Nikon optics are very well made, those lenses don’t deserve to be left in a box without any use at all. Enjoy that FE! She is a beauty 🙂
I’m glad the information has been useful. Thank you for your time to comment and read the post. 🙂
LikeLike
I just ordered one from eBay and this review shows everything I wanted to know on the technical details for this camera. Thank you
LikeLiked by 1 person
I’m glad it was helpful to you. I’m sure that you won’t regret that purchase. Enjoy it! 🙂
LikeLiked by 1 person
If you don’t press button 13, the film rewind crank will do nothing, if you roll it around?
LikeLiked by 1 person
Sorry for my late response. When you load the film, is not necessary to press that silver button. However, when you finish the roll, previous to rewind the film, you have to press down the button to release the rewind mechanism and the lever will rewind smoothly. You SHOULD NOT attempt to rewind the crank without doing so! You could damage the lever or tear apart the film from its canister (or both)! The same procedure applies to many SLR cameras from different brands. I hope it helps!
LikeLiked by 1 person
What does the small black lever do right where you the 9 on?
LikeLike
You have to pull towards you that “little black lever” and hold it. While you keep it pull down, you take the lever crank and pull it up to open the film door. 🙂
LikeLiked by 1 person
Thanks. 🙂 1st film done. No idea how the shots will look. 🙂
LikeLike
I’m glad for that. Not knowing how the photos will look, is part of the beauty of shooting film. The expectation!
LikeLiked by 1 person
Here are some of the shots. https://www.facebook.com/fottostrazds/posts/596353460526752
LikeLiked by 1 person
They look great! What brand of film is that?? (I’m guessing “Kodak”) 🙂
LikeLiked by 1 person
I don’t know who you wrote this for but you helped a brohter out.
LikeLike
Your article peletcfry shows what I needed to know, thanks!
LikeLike
Yes, It was Kodak gold 200
LikeLiked by 1 person
Have been a Contax 139q user for years…….aquired an FE recently and love it…..both very similar specs. Put a Tokina 28 – 85mm ATX (the old pro lens) in it……and seriously impressed. Great article…..many thanks from france!!
LikeLike
Thanks for that! It’s just the answer I nedeed.
LikeLike
My everyday go to has been the Nikon FE for years. I get great results.
LikeLike
An extraordinary page that you have, I thank you for sharing it with those of us in the know.
LikeLike
An extraordinary article that you have, many thanks for sharing it with the public.
LikeLike
An excellent way of looking at things that you have, we thank you for sharing it with the web.
LikeLike
A sensational article that you have, merci for sharing it with the web.
LikeLike
An aspirational page that you have, kudos for sharing it with those of us in the know.
LikeLike
An incredible point that you have, many thanks for sharing it with the public.
LikeLike
Thank you for reading it, Zina!
LikeLike
Thank you for another wonderful post. Where else could anyone get that kind of info in such a perfect way of writing? I have a presentation next week, and I am on the look for such information.
LikeLike
Thank you for reading, Israel! I’m glad the information helped you.
LikeLike
I enjoy what you guys are usually up too. Such clever work and reporting! Keep up the awesome works guys I’ve added you guys to our blogroll.
LikeLike
Thanks a lot, Lanita! I appreciate your time and kind words.
LikeLike
My brother recommended I would possibly like this web site. He was once entirely right. This submit actually made my day. You can not consider just how much time I had spent for this info! Thank you!
LikeLike
Thank you! I really appreciate it.
LikeLike